Thursday, February 28, 2013

Homemade Spice Rubs gift platter.

I struggle to think of fun, useful gift ideas for the men in my life. My brother recently had his birthday and I know he likes lollies, but I wanted to give him something else as well, as I have given him just lollies for the past couple of years. Most men I know love to BBQ and eat meat, so I decided to do some homemade rubs, insipred by these ones I saw on Pinterest.

I bought three clip close glass jars with different colured lids and a small white platter to put them on. Then I bought some wrapped lollies and spices. The three rubs I made were:

Brown Sugar Rub:
2 T. brown sugar
1 T. salt
1 T. paprika
1 T. chili powder
1 T. ground black pepper

Tandoori Rub:
1 T. ginger
1 T. cumin
1 T. coriander
1 T. paprika
1 T. turmeric
1 t. cayenne

Greek Rub:
1 T. parsley
1 T. coriander
1 T. paprika
1 T. turmeric
1 T. salt
1 T. chilli flakes
 
I placed each one in a different container and printed off some labels I made on the computer using Creative Memories Storybook software then punched them out using my circle punch. I placed each label on the container using Glue Dots. Then I placed the glass containers on the platter, securing each one at the bottom with a bit of Blu-Tack, and spread the wrapped lollies around the jar.


Yum! An easy gift for a guy that is not too expensive and takes less than ten minutes to put together. The jars and platter can be used again, and the lollies are always appreciated!
 
I am linking up to Real Family Fun.

Wednesday, February 27, 2013

Tic-Tac-Toe


Time again for another Merry Monday challenge! This week it is Tic-Tac-Toe, where we have to choose one line from this graph.


I chose red, punches and snowflakes as I had an idea starting to form in my mind. I always have extra snowflakes left over when I purchase Christmas kits, as we celebrate Christmas during summer here in New Zealand, but I do send Christmas cards to people in America so this one will be heading their way!


I used red as my background colour and the snowflakes were cut outs from an old CM kit. I also had some snowflake paper ribbon and embossed some blue cardstock to match. I also punched out some blue circles. I coloured and stamped the sentiment onto white cardstock and punched it out as well. I know grey and blue aren't the first colours you think of to go with red at Christmas, but I think they work together quite well!

Supplies used:
Creative Memories: Nordic Christmas Paper Pack, Winter Wonderland Quick Kit, Seaglass cardstock, White cardstock, Grey cardstock, Holidazzle Paper Ribbon, Circle Maker Punch.
Stampin' Up: Perfect Polka Dots embossing folder, Cute and Curly stamp set, Curley Label Punch, Cherry Cobbler ink, Basic Grey ink.

Bedroom Redo Part One

Sometimes it's amazing what just a coat of new paint can do to a room. When we moved into our house, we knew we were expecting another boy and yet the second bedroom did not seem like a little boy's room at all. A perfect excuse for a makeover!

Here is what we started work on:


The first option was to choose a colour- we knew we wanted a blue hue and the Dulux Colours of New Zealand range appealed. We ended up choosing Sumner, a blue colour based on a wonderful beach near us.


Hubby settled in to paint....


Looking better already! But of course the pink cutains had to go. My mum has her own curtain making business so that was the easiest part. We chose a fabric from Fabric House during their sale and my mum made the curtains for us.


Now the room looks a lot more like a little boy's room!


Now I need to add some fun prints to the walls and possibly some sort of wall decal, but new paint and curtains is definitely a start, and a vast improvement.


See that bookcase? That is my next project, which I will be sharing with you next Wednesday, so stay tuned!

Linking up with Savvy Southern Style at Wow Us Wednesdays!

Friday, February 22, 2013

Word Art Photo Panel

I have seen a lot of date word art panels on Pinterest so I thought I would have a go at making my own. Creative Memories have just released their photo panels and so I was excited to create a masterpiece for my home! With photo panels, the picture or word art is printed onto a solid, slim-line metal surface so it is like a picture and frame all in one. The panels come in four sizes (8x8, 11x8.5 landscape, 8.5x11 landscape or 12x12) and I am thinking I will definitely get the largest option!

I collected the significant dates I wanted on the panel and got to work. I wanted quite a modern look as I want the panel to stand out and be a talking point in my home. Black is always going to be my first choice when it comes to large fonts, and then I added pops of red to make the names stand out and also the word "day". The red will match my kitchen when I finally re-do it, and I have the perfect spot in mind of where to put this panel. Finally, I added a rugged overlay to the panel to give it a distressed look, which I think will go great with the either metallic or the classic photo panel option.


I used Storybook Creator Plus 4.0 from Creative Memories to create this word art, as well as the following kits and fonts:

Rugged Alpha Set
Brush MT script
Lucida Sans Typewriter
All Roads Lead Home Digital Kit
Rugged Digital Overlays.

Now to get it ordered- still deciding on whether I want a classic or metallic finish but I am looking forward to seeing it and will be sharing it with you when it arrives!

Thursday, February 21, 2013

Tan Fingers

My mum has a really old, falling apart handwritten recipe book with all of the gems from my childhood. I recently borrowed the book and copied all of the recipes I remember and love. One of these was Tan Fingers- a base with a gooey layer of caramel topped with dough and chocolate chips. Yum!

You will need:
  • 175 g butter
  • 1/4 cup white sugar
  • 1 tsp vanilla essence
  • 2 cups flour
  • 50 g butter
  • 1 tbsp golden syrup
  • 1/2 cup sweetened condensed milk
  • 1/2 cup chocolate chips
  •  
    Melt together the butter, condensed milk and golden syrup and leave to cool.
    Grease and line a 9x13 tin. Cream butter and sugar and mix in vanilla. Add flour to form a stiff dough. Put two thirds of this mixture into prepared tin, pressing it in firmly. Put the remaining third in the fridge.
    Spread the melted condensed milk mixture over the base.
    Sprinkle the chocolate chips over this.
    Remove the rest of the flour mixture from the fridge and crumble over top of the chocolate. Bake at 150 degrees C for 50 minutes. Leave in tin to cool and then cut into fingers.

    Good thing I remembered to take a picture as I was cutting it up, before some certain grubby fingers got their hands on a piece!


    Linking up to Real Family Fun.

    Tuesday, February 19, 2013

    Christmas Elegance

    Merry Monday has a very broad theme this week- Elegant Christmas cards. Elegance to me is rich colours, cream, jewels and lace, so I kept that in mind when creating my card.

     
    And my version of an elegant card:


    I used Bravo Burgundy cardsotck for the base, and matted it with a dark green PP that had a slight pattern to it. Then I cut out an embossed circle that reminded me of lace in a cream paper, and added the JOY stamp punched out onto the cream paper and popped up with foam squares. A little bit of bling completed the look.

    Supplies used:
    Creative Memories: Noel Paper Pack, Foam Squares.
    Stampin' Up: Bravo Burgundy Cardstock, Lacy Brocade embossing folder, Joyous Celebration stamp set, Bravo Burgundy Ink, Garden Green Ink, Basic Rhinestone jewels, large oval punch.
    Other: Cuttlebug


    Monday, February 18, 2013

    Taking the guesswork out of Preschool lunches

    My three year old starts at Preschool on Thursday, and I think it is safe to say that I am the more nervous one! I hope he shares nicely, doesn't yell too much and listens to the teachers. He keeps asking when he is allowed to go to school and is so excited to have a new backpack and lunchbox.

    Filling that lunchbox was one thing I stressed about- I had no idea how much or what type of food to pack. Thankfully, the preschool gave me a bit of a guide on foods that were not allowed, and I had a sneak peak at some of the other children's lunchboxes when we were there for a visit.

    Most of the time I will be putting together his lunch, but if I am busy with the baby or my husband feels like making two lunches, I wanted a bit of a guide for him so that the lunchboxes would be consistent. I ended up making this 6x4 print that can go on the fridge.

    This way I can get my son involved in the process as well, as he can choose one item from each column. I only have to do the full lunch once a week, plus the snack and fruit/veg option once for his half day, but I am sure it will come in very useful if we are in a rush in the morning! This will also be handy if we are going somehwere were I need to pack a lunch, not just for Preschool.


    Please feel free to print one of these off for your own fridge too :)

    Saturday, February 16, 2013

    Getting Fit Friday

    Hello Friday! Well technically it is Saturday morning here, I spent all of last night participating in a Virtual Crop and drafted this page but forgot to post it!

    This week has been full of chocolate thanks to Valentine's Day and kind neighbours. I limited myself to four wrapped chocolates or four squares of chocolate each day and still managed to keep at my goal weight. I even got glammed up for dinner even though I just cooked for my husband and we stayed in!


    My goals for last week were:

    Cook a special and healthy Valentines Day meal for my husband.
    I made Tandoori Fish, Indian Rice and corn cobs, then we had our special pudding.

    Buy some new underwear!
    I only bought one set as it was hard to get to the mall this week with two sick children, but I was happy with my purchase.

    Do the Summer Arms Challenge each day.
    This one hasn't happened so I am going to do this next week.

    Send my son off to his first day of preschool with a healthy lunch.
    Unfortunately my son is still sick so he is starting preschool next week.

    So my goals for this week are:
    Do the Summer Arms Challenge each day.
    Send my son off to his first day of preschool with a healthy lunch.
    Log my food on MFP- I have been pretty slack for the last week!
    Eat three servings of vegetables each day.

    I hope everyone had a great week!

    Linking up to Getting Fit Friday.

    Friday, February 15, 2013

    BIL Birthday

    I always find it hard to make masculine birthday cards- I need more manly stamp sets! One of my favourites is the Loads of Love stamp set from Stampin' Up, and I have used the truck stamp for lots of cards. I had my brother in law's birthday in the weekend and wanted to make him a simple card.

    The latest Seize The Birthday sketch is:


    And here is my take on it:

     
    I embossed the brown cardstock with a woodgrain embossing folder to give it a really rustic feel. The sentiment was printed out from my computer as I couldn't find any sentiments large enough to go with how I wanted the card to look. I stamped the truck and cut it out using the Creative Memories Custom Cutting System with oval patterns, and did the same with a larger oval with some patterned paper that had a rustic look to it as well. My finishing touch was some brads on the wheels.
     
    Happy birthday to my brother in law!

    Thursday, February 14, 2013

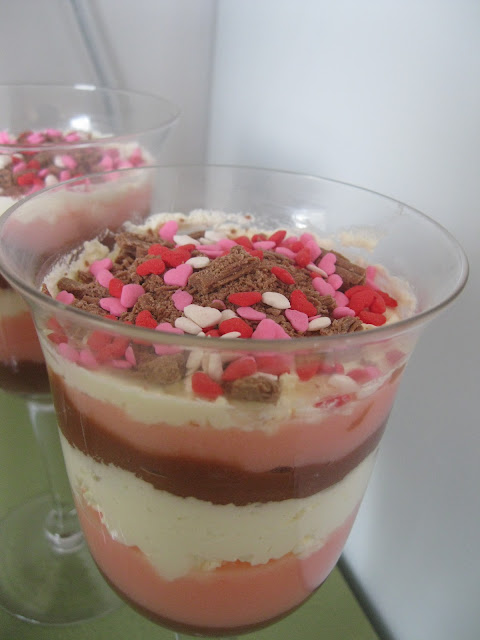
    Valentines Day Pudding Parfait

    It is Valentine's Day here in NZ, and while I typically do not buy anything for my husband, I like to have a special dinner for him when he gets home. I made these pudding parfaits with my three year old son today, and he was so excited!


    To make these, make up a batch each of chocolate instant pudding, strawberry instant pudding and whipped cream. Put each pudding in the fridge for ten minutes then layer in a parfait glass with chocolate, then strawberry, then whipped cream. Repeat and top with flaked chocolate and some sprinkles. I found these love heart sprinkles in the baking section of the supermarket.


    Simple and yummy!

    So happy to be linking up to the new link party Real Family Fun with KC.
    Linking up with Kitchen Fun and Crafty Friday.

    A card for my Valentine

    My husband and I tend not to celebrate Valentine's Day too much as we have our wedding anniversary close to February 14th. But everyone needs a card! I already had a concept in mind when I saw the challenges over at CASology and Use It Tuesday.


    Fasten your buttons.
    Anchor your eyelets.
    Tighten those brads.

    This week, we want to see your FASTENERS!!

    The buttons I used for this card have been in my stash since 2009, as well as the rub ons. I purchased both of them when one of my favourite stores was having their closing down sale, which was before my three year old was born, so I am glad to finally be using them! Of course, the buttons and cardstock are a burgundy red in keeping with the CASology cue card.

    I embossed the burgundy cardstock for a romantic lace look, and used a variety of burgundy buttons to make a heart shape. The rub on I used has some meaning for my hubby, as he is a fan of The Beatles.

    Happy Valentines Day!

    Supplies used:
    Creative Memories: White cardstock.
    Stampin' Up: Bravo Burgundy Cardstock, Lacy Brocade Embossing Folder.
    Kaisercraft: After Five Collection rubons.
    Other: Cuttlebug, buttons from my stash.

    Wednesday, February 13, 2013

    Happy Holidays card

    I love it when I unexpectedly find something I can use for my crafting stash. I got my husband a wedding anniversary present last week and the package came wrapped with some red baker's twine. I instantly put it by my craft desk because I knew I could use it on a card or layout. The I saw this week's sketch at Merry Monday and knew exactly what I could use the twine for!


    Here is my card.


    The twine reminds me of candy canes, one of my favourite things about Christmas! I even had a candy cane hot chocolate when I was making this card. The trees are from a new stamp set I just received last week, and I was excited to use up some Christmas paper scraps I had found during the weekend.

    I like this card the most out of all the Merry Monday challenges I have done so far, this one will be put away for an extra special person!

    Supplies used:

    Creative Memories: Primary Christmas Kit, White cardstock, 12" Rotary Trimmer with Straight and Scoring Blades, Foam Squares.

    Stampin' Up: Merry Messages Stamp Set, Merry Minis Stamp Set, Crumb Cake cardstock, Framelits Labels Collection, Garden Green ink, Cherry Cobbler ink.

    Other: Red Baker's Twine, Cuttlebug.

    Sunday, February 10, 2013

    Happy Birthday STB #5

    Time for another birthday card sketch over at Seize The Birthday! This week is a feminine sketch based on the following design:

     
    I kept my card pretty simple, using some really old pink cardstock I found in my stash as well as some more of my hoarded stickers.
     
     
    The papers were part of a standard range, but they match the sticker perfectly and I like the girly colours. The finishing touch was the Happy Birthday banner, which I stamped and then shaped into a banner with my square punch. You can't really tell from this photo but the pink circle was made from slightly textured cardstock and then matted with plain yellow cardstock.

    Thanks for looking!

    Supplies used:
    Creative Memories: Gazebo Birthday stickers, Gazebo PP, Butter cardstock, square punch, CCS with round shapes.
    Stampin' Up: Bring On The Cake stamp set, Rose Red ink.
    We R Memory Keepers: Baby Mine Collection Pink Textured Cardstock

    Saturday, February 9, 2013

    Getting Fit Friday- Spinach Enchiladas

    I am finally over the yucky tummy bug I had last week, and by some small miracle the weight I lost has not come back. I am still sitting comfortably at my goal weight, even with a few indulgences this week.

    My goals for last week were:

    Drink 6 glasses of water each day.I managed this- I am still limiting myself to two cups of coffee a day and chilling my water has made such a difference.

    Have two vegetarian meals this week.
    We had pumpkin soup and garlic bread on Saturday as we were still feeling a bit yucky, and then had Spinach Enchiladas for tea on Wednesday night. They were amazing so I thought I would share the recipe with you (see below).

    Have a fruit platter for Monday night dessert.
    It rained all day Monday and so I ended up warming the apricots and putting granola on top. Still a fruit dessert, just a warm option!

    Eat a healthy option when I go out for dinner on Sunday.
    We ended up going out for breakfast as it was easier to get a babysitter. I only had a half portion of the Eggs Benedict, but I did allow myself to indulge a bit as I was needing some food after my tummy bug! I am glad I did not get the full portion, it was enough to satisfy me and I really enjoyed being out for a meal with my husband to celebrate our wedding anniversary.

    The Spinach Enchiladas I made were a fantastic vegetarian meal, as my whole family loves Mexican inspired food and no-one missed the meat. I based it on this version but I used low fat versions of all the dairy products, cut down on the amount of cheese and used light tortillas.

    Ingredients:
    • cooking oil spray
    • 1/2 cup sliced green onions
    • 2 cloves garlic minced
    • 1 (10 ounce) package frozen chopped spinach thawed, drained and squeezed dry
    • 1 cup light ricotta cheese
    • 1/2 cup  light sour cream
    • 1 cup shredded cheese
    • (6 inch) light flour tortillas
    • 1 (19 ounce) can enchilada sauce
    Preheat the oven to 375 degrees F (190 degrees C).
    Spray saucepan with oil spray and heat over medium heat. Add garlic and onion; cook for a few minutes until fragrant, but not brown. Stir in spinach, and cook for about 5 more minutes. Remove from the heat, and mix in ricotta cheese, sour cream, and 1/2 cup of cheese.
    In a skillet over medium heat, warm tortillas one at a time until flexible, about 15 seconds. Spoon about 1/4 cup of the spinach mixture onto the center of each tortilla. Roll up, and place seam side down in a 9x13 inch baking dish. Pour enchilada sauce over the top, and sprinkle with the remaining half cup of cheese.
    Bake for 15 to 20 minutes in the preheated oven, until sauce is bubbling and cheese is lightly browned at the edges.

    On to my health and fitness goals for this week:

    Cook a special and healthy Valentines Day meal for my husband.
    Buy some new underwear! All my unmentionables keep slipping down when I walk, not a good look when I am wearing a skirt.
    Do the Summer Arms Challenge each day.
    Send my son off to his first day of preschool with a healthy lunch.

    Linking up to Getting Fit Friday! I would love for you to join us.

    Fairytale Birthday card

    This week's CASology cue card stumped me for a while....


    Then I remembered some of the fairy stickers I had come across after a big clean out a few weeks ago. My niece has a birthday coming up so I made this card for her as she loves fairies.


    For some reason the ribbon and wording looks a bit crooked in this photo, but it looks fine in real life! I stamped the sentiment in Wisteria Wonder and used the same colour to sponge around the edges of the square. I rounded the edges of the card to match the centre shape, which is then popped up on Foam Squares. The purple strip and fairy are stickers from my very old stash (2007!) so I am glad to find a home for them. I think the sentiment matches the cue card perfectly. The purple strip and the fairy have glitter accents on them, so I like the fact that this is a girly card yet still simple to make, as the stickers did most of the work for me!
     
    Supplies used:
     
    Creative Memories: Fairy stickers, White cardstock, Lilac cardstock, CCS with square shapes, foam squares.
     
    Stampin' Up: Wisteria Wonder Ink, Bring On The Cake stamp set.

    Thursday, February 7, 2013

    Owl softie and card

    I am so lucky to belong to a wonderful group of online Mamas with July babies. We share stories, ask advice, and share our experiences. I have not met any of the ladies in real life as most of them live in America, but it always good to know there is someone I can turn to when I have a question or just need to vent.

    We participated in a Valentines present exchange, and my baby boy was paired up with a sweet wee girl called Natalie. Her mum wasn't too fussy about colours of theme, so I turned to my new favourite website, Felt. I found an adorable owl softie from the seller stitchaholic and immediately knew it would be a great personalised present for Natalie.

    The whole process was so easy- the seller emailed me some fabric options and I chose the design, and then she made it and posted it to me. She was quick and efficient with her emails, and I was so thrilled with the end result!


    Look at that cute owl fabric! The wings fold close over the softie, it has a rattle inside and the owl came in a purple organza bag ready for gift giving.  The owl can also be made in a bigger size. Such a cute and unique gift for babies that can be easily customised- check out her Felt store for more fabric and colours.

    Note: I was not paid or asked to write this review- I am doing this because I loved the product!

    Of course, I had to make a card to go with the owl softie and this is what I came up with.


    The owl and hearts are from retired stamp sets. I used baker's twine for the balloon strings and popped the hearts up on Foam Squares for some pop. The sentiment was punched out then inked to stand out, and I added some red paper to the edges of the card for some interest.
     
    Creative Memories:
    White cardstock, Cheerful Valentines Additions, Foam Squares.
     
    Stampin' Up: Punch Bunch stamp set, I Heart Hearts stamp set, Teeny Tiny Sentiments stamp set, Modern Label Punch, Soft Suede Ink, Bravo Burgundy Ink, Melon Mambo Ink,  Rose Red Ink, Cherry Cobbler Ink, Lucky Limeade baker's twine.

    Sunday, February 3, 2013

    All Star card

    My husband and I played soccer for our school teams, and my three year old loves to kick around a soccer ball. So when I saw the cue at CASology this week, soccer was the first thing that came to mind.


    I love the green of the soccer pitch, so chose the pops of green for the background and paper strips. The green paper has a subtle, mud-splashed feel to it- who doesn't get muddy during a soccer game? The soccer balls were stamped with Basic Black ink then popped up with dimensionals. Finally, I embossed the white background with stars to match the "All Star" sentiment. which was a sticker I put on white cardstock and cut out.


    A simple soccer card for my sports mad toddler!

    Supplies used:

    Creative Memories: White cardstock, Green cardstock, Soccer Additions, Foam Squares.

    Stampin' Up: Family Favourites stamp set, Basic Black Ink.

    Craft Concepts: Embossing Folder Starry Night

    Cuttlebug

    Saturday, February 2, 2013

    First Birthday Card

    I am so lucky that I got three nephews last year, my boys will have lots of playmates growing up! Of course, this means lots of first birthdays ahead, so when I saw the sketch at Seize the Birthday I knew I should make a first birthday card to be prepared.

    Here is the sketch:


    I deviated from the sketch a bit as I was playing around with ribbon and wanted the card to look like a wrapped present. I used some blue ribbon for the middle strip as well as the banner down the bottom, I hope that is OK! I also continued the circle theme of the paper over into the other card elements. The "1st" circle is popped up on Foam Squares for some dimension.
     
    I am looking forward to making two more baby boy cards in the coming weeks!
     
    Supplies used:
     
    Creative Memories: Discover Baby Boy Kit, Discover Paper Buttons, Discover Paper Frames, Whitw cradstock, Cloud cardstock, 12" Rotary Trimmer with straight and scoring blades.
     
    Stampin' Up: Bashful Blue Grosgrain Ribbon, Mini Glue Dots.

    30 day shred results

    This is a really hard post to write. I was so geared up to do the 30 Day Shred, and promised myself that I would stick to it and not let anything get in my way. The first 20 days were amazing and I was feeling good, but then I discovered I had Diastasis Recti and should not do any of the core work. Right, I thought, I will just do extra lunges during the ab workout segments. However, due to a teething baby taking two hours a night to settle and a dose of a flu/stomach bug, I have yet to manage any of the Level 3 workouts. The 30 days is up though, so I still feel that I should post my results.

    I lost 4.2kg (9.2lbs) on the 30 Day Shred and reached my goal weight, so at least that is something to be proud of! Unfortunately I did not do measurements, but I strongly suggest that anyone starting this programme do measurements as well as look at your weight on the scale.

    Before and after photos:


    I have noticed the biggest difference in my midsection. My arms still need a bit of work, but I am very happy with the results I have acheived with Jillian!
     
    On to my last week's goals:

    Drink water when I get a chocolate craving.
    Done! This was easier once I chilled water in the fridge, it seemed nicer than drinking lukewarm water out of the tap.
    Have one vegetarian meal this week.
    I was supposed to have Spinach Enchiladas last night but was throwing up due to the flu. So I had a cup of tea and some toast- that still counts as vegetarian right?
    Prepare a snack station in the fridge and pantry for myself and Lucas.
    Due to the flu I have purchased all of the snacks but have yet to make the actual station. My three year old is so exctied to eat his pretzels, although he has not been a big fan of the cheese sticks.
    Try to get at least six hours of sleep each night.
    Done, although very broken sleep! I had a few naps on Thursday due to being sick, and so that has helped me to catch up on some sleep.

    My goals for this week are:
    Drink 6 glasses of water each day.
    Have two vegetarian meals this week.
    Have a fruit platter for Monday night dessert.
    Eat a healthy option when I go out for dinner on Sunday ( if I am feeling better!)

    Linking up with Getting Fit Friday!

    Friday, February 1, 2013

    Indulgent Chocolate Fudge Brownie

    One of my favourite things to do is bake, and I am glad that that passion has already rubbed off on my three year old son. Every time I get my cake mixer out, he puts on his apron and tells me not to make a mess!

    One of our favourite things to bake together is my brownie. This is my best known recipe among my friends, and I am sharing the recipe today so that you can try it too! I get requests for it all the time, and it is so easy to make as everything can just go in the cake mixer, then into a pan and into the oven. My three year old loves helping, especially with the chocolate chips!


    Indulgent Chocolate Fudge Brownie:

    200g butter, melted
    3/4 cup cocoa
    2 cups castor sugar
    1/4 teaspoon salt
    4 eggs
    1 teaspoon vanilla essence
    3/4 cup flour
    1/2 teaspoon baking powder
    2 cups chocolate chips

    Preheat oven to 150 degrees. Spray an 8x8 baking tin with non-stick spray or line with grease proof paper.Mix the melted butter, cocoa, sugar, salt, eggs and vanilla essence until well combined, beating until colour lightens (about 4-5 minutes).Gently mix in the flour, baking powder and chocolate chips.Pour into the prepared tin and bake for 50-55 minutes.The brownie should still be quite soft in the middle, but will have cracked slightly and pulled away from the edge of the tin.Cool completely in the tin, then cut and store in an airtight container.

     
    This brownie is dense, chocolately, and perfect for making for friends and family!

    I am linking up to Kitchen Fun and Crafty Friday Link Party.
    Related Posts Plugin for WordPress, Blogger...