Thursday, July 21, 2011

Food: Spicy Beans on Baked Kumara

There is nothing I love more in winter then a steaming bowl of bean chilli. Instead of serving it over corn chips, I have discovered that serving it over baked kumara is a delicious alternative and surprisingly filling! Here is the recipe for you to try, which I have adapted from Homestyle Vegetarian by Bay Books.

Ingredients:
3 medium kumara
1 large onion, chopped
1 tsp minced garlic
2 teaspoons ground cumin
1 teaspoon ground coriander
1/2 teaspoon chilli powder
1 400g tin chopped tomatoes
1 cup vegetable stock
1 zucchini, finely diced
1 green capsicum, finely diced
1 can corn kernels, drained
1 can red kidney beans, drained and rinsed
sour cream and grated cheese to serve

Preheat the over to 210 degrees C.
Rinse the kumara then pierce with a sharp knife. Bsake in the oven for 1 1/2 hours or until soft.
Meanwhile, cook the onion in a saucepan over medium heat for about 5 minutes. Add the garlic and spices and cook for a further minute.
Add the tomato and stock, stir well, and then add the vegetables and beans.
Bring to the boil then reduce and cover to let simmer for 20 minutes.
Uncover and then cook for a further 10-15 minutes until the liquid has reduced and the mixture has thickened.
To serve, cut the sweet potatoes lengthways and spoon the bean mixture over top. Add a dollop of sour cream and sprinkle with sour cream.


Yummy! This serves three people but I find there is enough of the chilli mixute to have leftovers on toast the next day. I hope you enjoy this recipe as much as I enjoyed eating it!

Tuesday, July 19, 2011

Craft: Pocket Card

Sometimes it is hard to know what to get people, and so gift cards can come in handy. However, I don't like giving people gift cards just on the cardboard flap, so here is my way of jazzing it up a bit. I have adapted this card from a Splitcoast Stampers tutorial by Beate Johns.

You will need:
Two sheets of cardstock in coordinating colours (I used Honeydew and Clay)
12 inch trimmer with cutting and scoring blade
Tape runner or other strong adhesive tape
Corner Rounder
Stamps, ink, ribbon and embellishments to decorate
Patterned paper

Please note that all measurements for this pocket card are in inches.

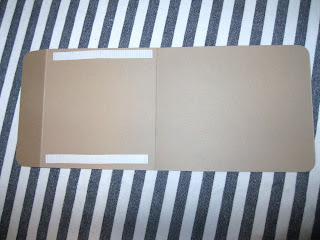
The first step is to cut your card. One piece should be 4 1/2 x 11  for the pocket, and the other should be 3 1/4 x 5.


Score the larger peice of cardstock at 5/12 inches and then again at 1 1/4 inches.


Corner round all four edges of the larger piece of cardstock.


Fold the card so that the 1 1/4 flap is folded over and facing towards you.


Decorate the front flap as you want using the patterned paper.


Since this pocket card was for a birthday present, I used my Punch Bunch Happy Birthday stamp and punched it onto a scrap piece of Honeydew cardstock with Chocolate Chip ink, and then cut it into a square and corner rounded the edges.


Using the tape runner, adhere your pocket card together down the long sides of the smaller flap.


Add the stamp, ribbon and other embellishments to the front of your card.


To make the pocker insert, add a strip of patterened paper to the top edge of your smaller peice of cardstock. I used the back of the polka dot paper, which had the stripe pattern on the other side.


Corer round the top two edges of the cardstock to make it easier to pull out.


Attach the gift card to the insert.


Slide the insert into the pocket of your card.


And there you have it! A lovely wee card that can be used to put any type of gift card in. This can be changed up in many ways for birthdays, weddings, baby showers etc by changing up the cardstock colours, embellishments and stamps that you use, so it is very versatile.


Sunday, July 17, 2011

Food: Bean and Rice Enchiladas

Here is another bean recipe for you, this time with a Mexican theme. You can make this dish as spicy or as mild as you want by omitting spices and using a mild salsa if you wish. This serves four people but can easily be doubled.

Ingredients:
1/2 green pepper, chopped
1/2 medium onion, chopped
1-1/2 garlic cloves, minced
1-1/2 teaspoons olive oil
1 can kidney beans, rinsed and drained (you can use chilli beans for more heat if you like things hot)
1 can Mexican flavoured tomatoes
2 tablespoons hot pepper Tabasco sauce
1-1/2 teaspoons chili powder
1/2 teaspoon ground cumin
1/8 teaspoon crushed red pepper flakes
1 cup cooked brown rice
4 (6 inch) flour tortillas, warmed
1/2 cup salsa
1/2 cup grated cheese
In a large nonstick skillet, saute the green pepper, onion and garlic in oil until tender.
Add the beans, tomatoes, hot sauce, chili powder, cumin and red pepper flakes; bring to a boil.
Reduce heat; simmer, uncovered, until heated through and mixture thickens.
Add rice; cook 5 minutes longer or until heated through.
Spoon a rounded 1/2 cup down the center of each tortilla.
Fold sides over filling and roll up.
Place in a baking dish coated with nonstick cooking spray.
Spoon salsa over each tortilla then cover and bake at 180 degrees C for 25 minutes.
Uncover; sprinkle with cheese and bake 2-3 minutes longer or until cheese is melted.
Related Posts Plugin for WordPress, Blogger...