Showing posts with label cookbook. Show all posts

Wednesday, December 31, 2014

Top 4 recipes of 2014

I can't believe that the end of the year is upon is- it seems so cliche but time really does fly when you have little people to run after.


We have been busy cooking up a storm this year, so I have rounded up my four most popular recipes for 2014.

At number four is the Raspberry Lamington Cake I made for my husband's birthday. Layers of cream, fresh raspberries and sponge make this into a decadent giant lamington.

The third most popular meal is Meatball Pizza, a combination of two of my son's favourite foods.

The second most popular recipe is a delicious Rhubarb Spicetrail Shortcake, which is great served warm or cold.

Number one is Roast Pumpkin and Cashew Chicken Curry- still a family favourite!

Thank you to all of you that have left comments, supported my blog posts and given feedback this year, and also a huge thanks to those of you who have made these recipes yourselves and let me know! I can't wait to share some more tasty dishes in 2015.

Linking up with Wow Us Wednesdays and Best of 2014 Link Up Party.

Monday, November 24, 2014

To The Kitchen!

Welcome back to another installment of the Poppins Book Nook!


This month's theme is To The Kitchen!


My boys both love baking and helping in the kitchen, so we focused on a couple of great kid's cooking books this month. The two that we loved were Chop Chop- The Kid's Guide to Cooking Real Food with Your Family and Ready, Steady Spaghetti. We chose both these books as they had great step-by-step photo instructions, were visually appealing and also both had comprehensive safety, healthy eating and recipe sections.

As well as being in the kitchen to cook, we also focused on science experiments this month using things you will find in the kitchen.

The first thing we did was create a water symphony. I filled three glasses with different amounts of water and the boys had fun hitting the glass with a wooden spoon and making different sounds.


A fun dessert was a Spider- we added a scoop of icecream to lemonade and watched it fizz up!


Lucas is a big fan of EvanTubed, so we replicated the Balloon experiment that he featured on YouTube.


It was so much fun to see the boy's faces light up as the balloon got bigger and bigger. A great science lesson that even the littlest family members can appreciate.


Of course, we also had to make something edible in the kitchen. We chose a simple recipe for Crunchy Nut Cornflake Slice out of the recipe book, as both my boys love breakfast cereal, peanut butter and chocolate. Lucas was a champ at measuring out the ingredients, and Adam enjoyed stirring everything together.


Here is a photo of the finished product- we will be sharing the full recipe on Wednesday so be sure to come back if you would like to make your own version of this slice!


We also made a New Zealand staple- Hokey Pokey. This involves heating 5 tablespoons of sugar with 2 tablespoons of golden syrup in a small pan. You then add 1 teaspoon of baking soda.


This puffs up and creates a golden candy.


Allow to set, and then break into pieces.


Both boys enjoyed trying the Hokey Pokey.


I put the boys in charge of choosing a recipe and making dinner on Monday night, and they chose the Cheese and Bean empanadas. Both boys did a great job mixing the ingredients and forming them into empanadas using our special cutter.


They looked great and tasted delicious- I was so proud of my boys for making these.


We had a great time using kitchen items to experiment, cook, bake and create dessert. Click below to see how other members of Poppins Book Nook were inspired!

 Clip art by MelonHeadz.


Enchanted Homeschooling Mom ~ 3 Dinosaurs ~ To the Moon and Back ~ Planet Smarty Pants ~ Farm Fresh Adventures ~ Growing in God's Grace ~ Chestnut Grove Academy ~ Learning and Growing the Piwi Way ~ The Usual Mayhem~ Preschool Powol Packets ~ Monsters Ed Homeschool Academy ~ Adventures in Mommydom ~ Teach Beside Me ~ Life with Moore Babies ~ Kathy's Cluttered Mind ~ Are We There Yet? ~ Our Crafts N Things ~ Hopkins Homeschool ~ ABC Creative Learning ~ Joy Focused Learning ~ P is for Preschooler ~ Laugh and Learn ~ A Mommy's Adventures ~ Inspiring 2 New Hampshire Children ~ World for Learning ~ Ever After in the Woods ~ Golden Grasses ~ A glimpse of our life ~ Journey to Excellence ~ Happy Little Homemaker ~ Little Homeschool Blessings ~ Raventhreads ~ Tots and Me ~ As We Walk Along The Road ~ Stir the Wonder ~ For This Season ~ Where Imagination Grows ~ Lextin Academy ~ The Canadian Homeschooler ~ School Time Snippets ~ Peakle Pie ~ A Moment in our World ~ Every Bed of Roses ~ Finchnwren ~ At Home Where Life Happens ~ The Library Adventure ~ Embracing Destiny ~ Day by Day in our World ~ Our Homeschool Studio ~ A "Peace" of Mind ~ Thou Shall Not Whine ~ SAHM I am ~ eLeMeNo-P Kids ~ Simple Living Mama


Wednesday, August 27, 2014

What's Cooking Wednesday #21

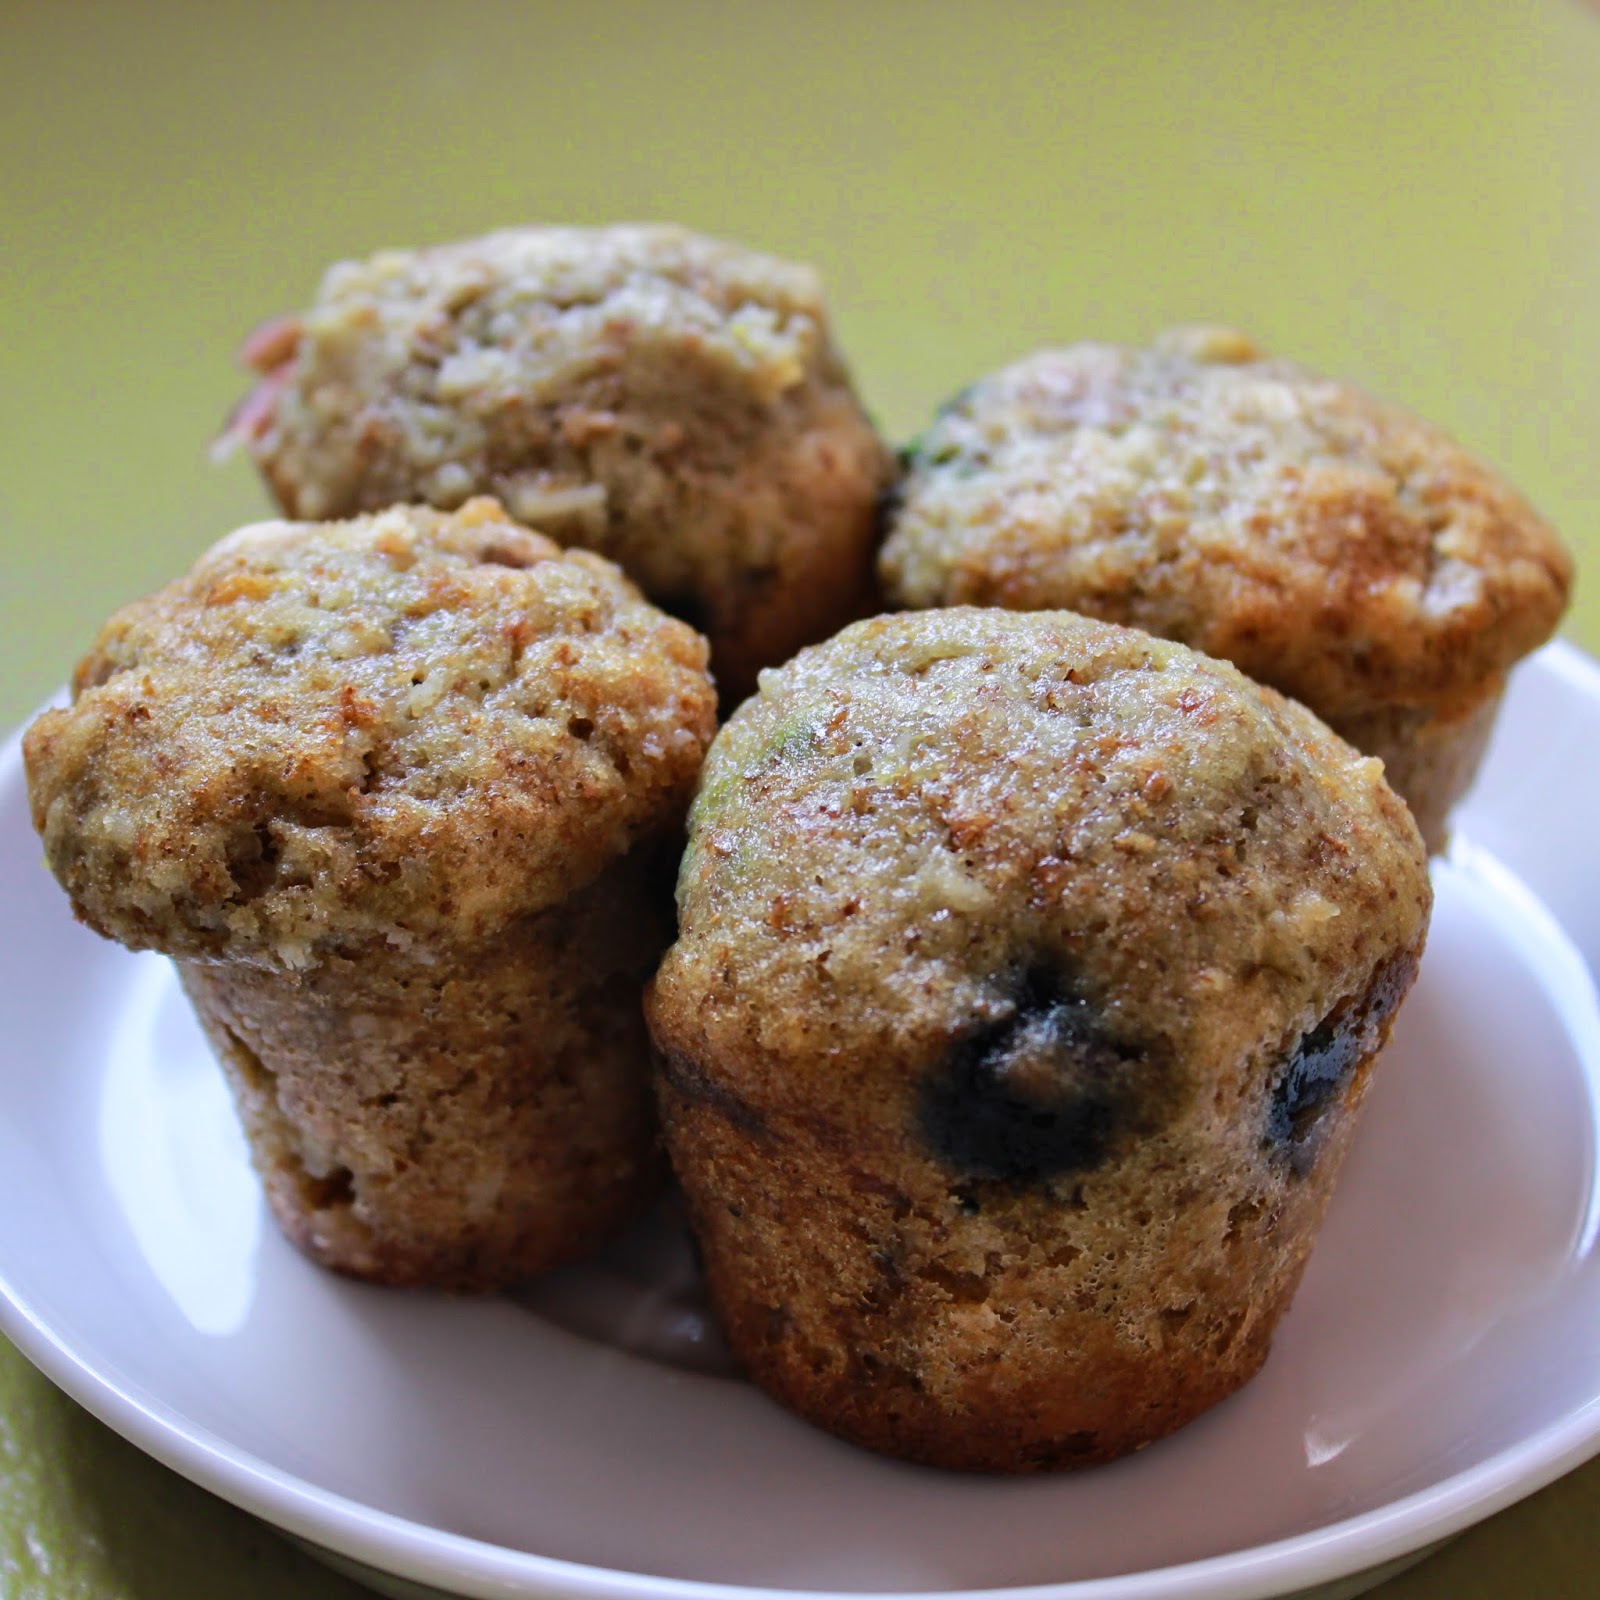
I know I have already shared my delicous Lemon and Blueberry Muffins, but I can never get enough of muffins! They can be a wholesome snack, breakfast or part of a lunchbox, and they freeze well.

My Simply Heaven Chocolate recipe book is coming back to feature this week, with the combination of blueberry and white chocolate coming together to provide a moist and tasty muffin.

Blueberry, White Chocolate and Coconut Muffins
adapted from Simply Heaven Chocolate

1 cup self raising flour
1 cup wholemeal flour
2 teaspoons baking powder
3/4 cup castor sugar
1/3 cup dessicated coconut
125g white cooking chocolate, chopped
125g blueberries
Finely grated rind of 1 lemon
3/4 cup milk
1/2 cup vegetable oil
2 eggs

Combine the first 8 ingredients in a large bowl.

Whisk together the milk, oil and eggs, and fold into the dry ingredients until just combined.

Spoon the mixture into greased muffin tins and bake at 190 degrees C for 15-18 minutes until golden and set. Stand for 10 minutes before removing to a wire rack. Cool then serve.

These can be frozen for up to three months, or will last 3-4 days in an airtight container.


The verdict: I got so many compliments on how good these muffins were, that I will be making another batch this week already! The coconut stops the muffins from being too sweet, and the white chocolate gives a gooey, caramel taste to the muffin.

Wednesday, August 20, 2014

What's Cooking Wednesday #20

Time for another chocolate-based item, as who doesn't like chocolate?

I turned to my trusty Simply Heaven Chocolate recipe book and decided to try out a kitchen gadget I got for Christmas- a macaron mat and kit. These are delicious little mouthfuls of happiness and I was a bit nervous to make them myself, but I figured the kit would be able to help me.

Milk and White Chocolate Macarons
(adapted from Simply Heaven Chocolate)
Macarons:
1 1/2 cups icing sugar
1/2 cup blanched almonds
1/4 cup cocoa
3 egg whites, at room temperature
1/4 teaspoon salt
1/4 cup caster sugar

Filling:
80g white chocolate melts
30g unsalted butter
100g cream cheese
1/3 cup icing sugar, sifted

Combine the icing sugar, almonds and cocoa in a food processor and process until super fine. Sift and remove any coarse pieces of almond.

Beat the egg whites and salt until soft peaks form. Continue beating, gradually adding the sugar until dissolved.

Fold the almond mixture into the egg whites until just combined. Pipe onto tray then stand at room temperature for 30 minutes until the macarons form a light crust.

Bake at 150 degrees C for 22-28 minutes or until firm to the touch. Allow to cool on the trays.

To make the filling, combine the chocolate and butter and melt in the microwave or over a pan of simmering water. Remove from the heat and cool slightly. Beat together the cream cheese and extra icing sugar then beat into the chocolate mixture. Chill until firm enough to spread.

To assemble, spread chocolate filling on to half of the macarons and top with the remaining halves, pressing together gently.

The kit came with a piping squeeze container and a silicone baking sheet that had circles for guides on it. I was not sure which guide to use as there were two circles, so I did some to the larger circle and some only filling the smaller circle.


When they had cooked, I discovered that I needed to pipe to the outer circle- Now that I know that, my next batch will be more even. I was very pleased with the biscuits themselves though.


I sandwiched them together with filling and they were the perfect size to accompany a cup of coffee.


The verdict- Time consuming but delicious! I am happy to make these again as a lot of time was waiting for them to form a skin, then waiting for them to cool.

Wednesday, July 23, 2014

What's Cooking Wednesday #19

I don't know what I would do without my slow cooker- it is such an amazing kitchen appliance!

My plan of making post-it-note marked recipes form my recipe books is coming along nicely, and this week I pulled out Best Recipes for Slow Cookers and Crockpots by Robyn Martin. This book is full of outstanding slow cooker recipes, and as well as your traditional stews and soups there are pie fillings, curries and cakes. So many recipes I want to try!


The recipe I chose this week was the Cajun Chicken Wraps- modified for children to be less spicy.

Cajun Chicken Wraps
adapted from Best recipes for Slow Cookers and Crockpots

1 teaspoon Cajun seasoning
1 packet Maggi Onion Soup mix
1/2 cup water
1 carrot
6 skinless, boneless chicken thighs
1/4 cup unsalted roasted peanuts
1/4 cup natural unsweetened yoghurt
4 flour tortillas

Mix Cajun seasoning, soup mix and water together.

Peel the carrot and grate finely.

Trim any fat from chicken and cut into 2cm strips.

Place soup mixture, carrots and chicken in the slow cooker with the peanuts and cook on LOW for 6-8 hours.

Half an hour before the end of cooking, mix in the yoghurt.

When ready to serve, warm the tortillas and place the chicken mixture down the centre of each tortilla. Fold bottom of tortilla over chicken and wrap around to enclose filling.


The verdict- This turned out to be quite a mild mix- it was almost more of a Satay Wrap. My four year old announced that the chicken was "40,000 delicious" and he hardly ever likes chicken dishes, so this was a big breakthrough! The wholegrain wraps I used were also a great tasting option, and the carrot snuck in an extra serve of veggies for the kids. Overall, I would make these again but probably add some more spice to the mixture.

Linking up with Wake Up Wednesdays.
Wake Up Wednesdays

Wednesday, June 18, 2014

What's Cooking Wednesday #14

I am pretty sure that every New Zealand home has a copy of the Edmonds Cookbook. This book has been through so many publications, and I have the original, Junior and Illustrated versions of this iconic cookbook.

Today I am sharing a recipe from the Edmonds Illustration Collection for Gingerbread Loaf. I have adapted this recipe based on what I had on hand.

You will need:
2 cups standard flour
pinch of salt
1 tablespoon ground ginger
1 tablespoon cinnamon
1 1/2 teaspoons baking soda
2 eggs
1/2 cup sugar
3/4 cup vegetable oil
2 tablespoons golden syrup
3/4 cup milk
1/2 cup sultanas

Lightly mix flour, salt, baking soda and spices in a bowl. In a separate bowl, beat eggs and sugar until thick and pale. Add oil, golden syrup and milk then fold into the dry ingredients. Fold in sultanas. Spoon into a loaf tin and bake at 180 degrees C for 45 minutes.

So easy to make- I whipped this up before dinner.


The verdict:
Slightly dry, but it had a lovely gingery taste and was great with some butter for afternoon tea. I will keep this recipe on hand as it is very quick and easy, plus I usually have these ingredients in the pantry and fridge. Next time I might add another egg and slightly more milk to see if that helps.


Wednesday, June 4, 2014

What's Cooking Wednesday #12

Getting a hot meal on the table in record time was the aim for this week's featured meal, and once again I turned to Jo Seagar for inspiration. Her Ploughman's Self-Crusting Pie sounded delicious and I had all of the ingredients on hand.

You will need:
  • 4 eggs
  • 1 cup trim milk
  • 1/2 cup self-raising flour
  • 3 tablespoons chow chow or other chutney
  • 1 1/2 cups grated cheese
  • 2 cups button mushrooms sliced in half
  • 2 mini peppers, finely diced
  • 3 small tomatoes
  • 4 medium potatoes cooked and cut into cubes
Whisk together the eggs and milk, then stir in the flour, chutney and grated cheese.


Mix in the potato cubes, mushrooms and peppers and pour into a pie dish that has been well sprayed with cooking oil.

Garnish with tomato slices and bake at 220 degrees C for 30 minutes.


The verdict:


I served this pie with some extra chow chow and steamed Cajun vegetables. Me, my husband and my younger son ate this pie. My four year old declared that he was full and didn't want any dinner! My husband was happy that there are leftovers for lunch tomorrow, and I bet it will taste good cold as well. I really liked how simple this was to make using ingredients I usually have on hand, and you could easily substitute other vegetables instead of mushrooms and peppers. This might be a new lunch idea instead of quiche, as the chow chow gave it a nice added texture.

Wednesday, April 23, 2014

What's Cooking Wednesday #10

It is that time of the week again where I dust off my cookbooks and try a recipe I have bookmarked but never gotten around to making.

If you live in New Zealand you are probably familiar with Jo Seagar, a bubbly personality with some fantastic cookbooks as well as a cooking school at Oxford. I have yet to try a recipe of hers that didn't result in a fantastic end product, so when I had a lot of rhubarb in the garden I turned to her books for some inspiration.

In her recipe book "You shouldn't have gone to so much trouble darling" you will find heaps of "easy peasy" recipes that look and taste great with minimal effort. Today I made her Rhubarb Spicetrail Shortcake.

Rhubarb Spicetrail Shortcake (adapted from Jo Seagar)

Base
125g butter
1/2 cup castor sugar
1 egg
1 1/2 cups self raising flour

Topping
1/4 cup flour
1 1 /2 cups castor sugar
4 sticks rhubarb, finely chopped
1 teaspoon mixed spice
2 eggs

Preheat the oven to 180 degrees C.

In a food processor, cream the butter and sugar then add the other base ingredients. Pulse to combine. Press into a 20x30cm slice pan.

Mix topping flour, sugar and eggs with the mixed spice in the food processor. Add the rhubarb and pulse until just combined. Pour on top of the base and bake for 55-60 minutes until firm and set.


The verdict:
This was yummy. Straight out of the oven it was gooey, inviting and tasty. My four year old even had two helpings although he had informed me he didn't like rhubarb when I was making the shortcake. My husband was also very impressed. This would have been wonderful with come icecream or custard, but because it was Good Friday when I made this and pouring with rain, we couldn't get to the shops and so we had it plain.

It was even better the next day. I may have had a slice for my second breakfast! This is going to be a great way to use up all the rhubarb in the garden and it has already been requested again.

Wednesday, April 9, 2014

What's Cooking Wednesday #9

It's that time of the week again where I try a recipe from a cookbook that has been sitting in my cupboard.


I cannot get enough of Annabel Langbein's book- I think I will end up trying 75% of the recipes in her book as they appeal to my food taste. This week, the Pineapple Upside-Down Cake called my name. The original recipe calls for one big cake, but I changed things up and made individual servings using a silicone mini cake form from Tupperware.

2 cups self-raising flour
1 teaspoon baking soda
finely grated rind of one orange
2 eggs
1 cup whole milk
1/4 cup brown sugar
1/3 cup golden syrup
1/2 cup oil

Topping:
50g butter, melted
1/2 cup brown sugar
2 tbsp golden syrup
225g can pineapple rings, drained

Preheat oven to 180 degrees C. Place all cake batter ingredients in a blender or mixer bowl and quickly process until smooth. Melt the topping butter with brown sugar and golden syrup. Pour some into the base of each individual form and then place a pineapple ring on top. Pour over the batter, tapping form on the bench to get rid of any air bubbles. Bake for 50 minutes.


These were amazing! Annabel suggests putting 1 teaspoon ground ginger in the cake batter and putting some hunks of glace ginger on top with the pineapple, which I think would be tasty but I did not do this as some family members do not like ginger. They were a perfect individual piece for a potluck dinner, with just the right amount of stickiness.

We served these beauties alongside a tub of Limon Spoonable Fudge. If you haven't tried Tub Dessert, you are missing out! They have a great range of flavours and are perfect as an accompaniment to hot or cold desserts, or even spooned straight out the tub if you just want a sweet pick me up.

This recipe would also be lovely as a full cake, and I would suggest if you make this as one big cake that you cook it for 70 minutes. A cherry in the middle would also be a great option of you don't like ginger.

Linking up with Wake Up Wednesday.

Wake Up Wednesdays

Wednesday, February 12, 2014

What's Cooking Wednesday #4

This week for my recipe I am using a cookbook that I won a while ago and never really read through. It is called Minced by Sue Hamilton and Dana Alexander, and it is all about using minced meats (ground meat for you overseas) and making everyday food. With two meat loving children this might just be my new go-to book!

I love a good pizza, but buying one from the supermarket or takeaway shop can get quite pricey and my children pick off half the toppings. In Minced, a recipe for Meatball Pizza caught my eye. I changed the recipe slightly to make the pizza dough in my breadmaker instead of by hand, but you can always do it traditionally. I also used bottled pizza sauce instead of making my own, as I somehow ended up with two bottles of it in my fridge.

Meatball Pizza
adapted  from Minced by Sue Hamilton and Dana Alexander

Pizza dough
1 cup warm water
2 tablespoons olive oil
1 teaspoon sugar
3 cups high grade flour
1 clove garlic, crushed
1 tablespoon Italian herbs
1 teaspoon salt
1 teaspoon active dried yeast

Meatballs:
250g beef mince
1/2 cup wholegrain breadcrumbs
1 egg, beaten
salt and pepper to taste

Topping:
3 tablespoons pizza sauce
2 cups grated mozzarella cheese

Place the dough ingredients in your breadmaker in order listed and set to dough method. Once the breadmaker has completed, place the dough in a bowl and cover with a tea towel. Leave to rise for 40 minutes. This dough makes enough for two bases, so you can put one aside for another day.


Meanwhile, mix the mince, breadcrumbs, seasoning and egg in a large bowl.

Place half of the dough on a floured tray and roll to the desired size.


To assemble, spread the base with the pizza sauce. Spoon tablespoons of the mince mixture into your hands and form into balls, placing on top of the pizza vase. Add a generous amount of mozzarella cheese.


Bake in a hot oven at 200 degrees C until the cheese is golden and the meatballs are cooked through, around 20-30 minutes.


The verdict:


I couldn't wipe the smile off my face during this meal- this is hands down the most successful pizza I have made. The base was thin and crispy, the meatballs were a great topping and all of my family enjoyed it. Because I have a second base left, I am going to make this again very soon.

Joining in with Wake Up Wednesdays.

Wake Up Wednesdays

Wednesday, January 22, 2014

What's Cooking Wednesday #1

One thing I love receiving is recipe books- I have post it notes all over them with recipes I want to try.

Well, this year I have decided to bite the bullet and make one recipe a week that I have flagged in my recipe books. I trawl Pinterest and food magazines a lot, but some of my recipe books have great tried and true recipes and it is time to find some new favourites.

My first recipe comes from Annabel Langbein's cookbook The Best of Annabel Langbein This is one of my go-to cookbooks but there are lots of recipes in here I have yet to try. I wanted something light but filling for a hot summer evening, and the Grilled Chicken and Crispy Noodle Salad looked amazing. I was intrigued by the combo of bananas, avocados and pesto with chicken and bacon in a salad, but since my family enjoys all of these ingredients I figured it was worth a try.

I got all of the ingredients together (minus the pesto, which was in the fridge!)


You marinate the chicken in lemon juice and pesto with whole lemon slices- it smelt so good. The recipe called for grilling the chicken, but I had already diced it so I just cooked it in the pan.


Then it was a matter of tossing all of the ingredients together...


And adding the crispy noodles to serve. Yum!


The salad was surprisingly filling, and the combination of flavours worked well. I would happily make this salad again, and wouldn't change a thing.

I really recommend any Annabel Langbein books to any cook wanting a fantastic book for reading as well as recipes- the food photography in this cookbook is so vibrant and it makes me want to cook every time. She is a great New Zealand writer and a lot of her recipes adapt well for busy families.

Linking up with Wake Up Wednesdays.

Wake Up Wednesdays
Related Posts Plugin for WordPress, Blogger...