Friday, September 2, 2011

Craft: Father's Day Card

Father's Day is this Sunday here in New Zealand, so here is a quick an easy card to whip up using paper scraps.

Oragami Shirt and Tie Father's day Card.

You will need:
One sheet patterned paper
12 inch Rotary trimmer with straight and scoring blades
Tape runner or other similar adhesive
Cardstock in 2 colours -a light colour and darker colour to match the patterned paper
Small scrap of matching plain paper
Happy Father's Day stamp- from teeny Tiny Sentiments stamp set
Brads to match your coloured paper

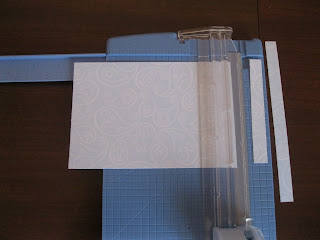
Firstly, cut your patterned paper to 4x6 inches, keeping the cut offs aside for later.

Change to the scoring blade and score down each long side at about 1 1/4 inches in.


Flip the paper over and then fold up the bottom of the paper in about half an inch, like so:
Flip the paper over again  and fold in the corners of the folded over edge to meet in the middle.

Take the bottom sides and fan them out, then add adhesive to the sides and along the bottom.
Fold the fanned up sides and bottom of the paper towards the top of the card to form a square.
To make the tie, take your plain paper and cut it into a 2x2 inch square.
Fold the square in half then unfold it.
Fold the two bottom edges up to meet in the middle and make a kite like shape.
Fold up the bottom third of the point towards the triangle.
Flip the paper towards you so that the triangle is at the top, fold it back, and then turn it over again. It should look like this (minus the manky finger!):

Turn it back over and fold the triangle piece up the top and let it overlap slightly.

Turn the peice of paper over again and stick the overlapping piece down, and then fold in the two sides in a kite shape once again, adhering them to the paper.

When you turn it back over you should have your tie!

Stick the tie on to the front of the shirt, and there you have your finished shirt and tie.
To make your card, cut the darker coloured cardstock to 6x10 inches, and then score at 5 inches.
With your lighter coloured cardstock, cut it to 4x5 inches.
Punch brads through the top two corners of lighter cardstock, then adhere to the darker card with tape runner.

Stick on the oragami shirt and tie.
Using the shirt cutoff, attach a strip to bottom of the lighter cardstock.
To make the title, stamp the Happy Father's Day greeting using co-ordinating ink (I used Bashful Blue) onto a scrap of the lighter coloured cardstock, then mat with the darker cardstock.
Stick this onto the card between the shirt strip and the lighter cardstock, and there you have it, a cute Father's Day card that the man in your life will love.




Wednesday, August 17, 2011

Craft: Wedding Card

This is just a quick post- I forgot to take pictures of the process as it was happening!

I made this card for an upcoming wedding. I used Cement coloured cardstock and scraps of paper I had left over from an old Cherish Paper Pack. I doodled the brackets using the Creative Memories Doodling Templates and then cut them out and adhered them using 3D foam squares. The heart sticker and the row of words were from random stickers I had. Finally, I stamped the words using Chocolate Chip Stampin' Write Marker on the Teeny Tiny Sentiments stamp set. It was very quick to make and I hope my friend will like it.

Thursday, July 21, 2011

Food: Spicy Beans on Baked Kumara

There is nothing I love more in winter then a steaming bowl of bean chilli. Instead of serving it over corn chips, I have discovered that serving it over baked kumara is a delicious alternative and surprisingly filling! Here is the recipe for you to try, which I have adapted from Homestyle Vegetarian by Bay Books.

Ingredients:
3 medium kumara
1 large onion, chopped
1 tsp minced garlic
2 teaspoons ground cumin
1 teaspoon ground coriander
1/2 teaspoon chilli powder
1 400g tin chopped tomatoes
1 cup vegetable stock
1 zucchini, finely diced
1 green capsicum, finely diced
1 can corn kernels, drained
1 can red kidney beans, drained and rinsed
sour cream and grated cheese to serve

Preheat the over to 210 degrees C.
Rinse the kumara then pierce with a sharp knife. Bsake in the oven for 1 1/2 hours or until soft.
Meanwhile, cook the onion in a saucepan over medium heat for about 5 minutes. Add the garlic and spices and cook for a further minute.
Add the tomato and stock, stir well, and then add the vegetables and beans.
Bring to the boil then reduce and cover to let simmer for 20 minutes.
Uncover and then cook for a further 10-15 minutes until the liquid has reduced and the mixture has thickened.
To serve, cut the sweet potatoes lengthways and spoon the bean mixture over top. Add a dollop of sour cream and sprinkle with sour cream.


Yummy! This serves three people but I find there is enough of the chilli mixute to have leftovers on toast the next day. I hope you enjoy this recipe as much as I enjoyed eating it!

Tuesday, July 19, 2011

Craft: Pocket Card

Sometimes it is hard to know what to get people, and so gift cards can come in handy. However, I don't like giving people gift cards just on the cardboard flap, so here is my way of jazzing it up a bit. I have adapted this card from a Splitcoast Stampers tutorial by Beate Johns.

You will need:
Two sheets of cardstock in coordinating colours (I used Honeydew and Clay)
12 inch trimmer with cutting and scoring blade
Tape runner or other strong adhesive tape
Corner Rounder
Stamps, ink, ribbon and embellishments to decorate
Patterned paper

Please note that all measurements for this pocket card are in inches.

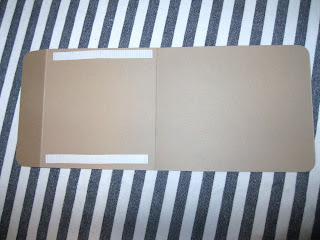
The first step is to cut your card. One piece should be 4 1/2 x 11  for the pocket, and the other should be 3 1/4 x 5.


Score the larger peice of cardstock at 5/12 inches and then again at 1 1/4 inches.


Corner round all four edges of the larger piece of cardstock.


Fold the card so that the 1 1/4 flap is folded over and facing towards you.


Decorate the front flap as you want using the patterned paper.


Since this pocket card was for a birthday present, I used my Punch Bunch Happy Birthday stamp and punched it onto a scrap piece of Honeydew cardstock with Chocolate Chip ink, and then cut it into a square and corner rounded the edges.


Using the tape runner, adhere your pocket card together down the long sides of the smaller flap.


Add the stamp, ribbon and other embellishments to the front of your card.


To make the pocker insert, add a strip of patterened paper to the top edge of your smaller peice of cardstock. I used the back of the polka dot paper, which had the stripe pattern on the other side.


Corer round the top two edges of the cardstock to make it easier to pull out.


Attach the gift card to the insert.


Slide the insert into the pocket of your card.


And there you have it! A lovely wee card that can be used to put any type of gift card in. This can be changed up in many ways for birthdays, weddings, baby showers etc by changing up the cardstock colours, embellishments and stamps that you use, so it is very versatile.


Sunday, July 17, 2011

Food: Bean and Rice Enchiladas

Here is another bean recipe for you, this time with a Mexican theme. You can make this dish as spicy or as mild as you want by omitting spices and using a mild salsa if you wish. This serves four people but can easily be doubled.

Ingredients:
1/2 green pepper, chopped
1/2 medium onion, chopped
1-1/2 garlic cloves, minced
1-1/2 teaspoons olive oil
1 can kidney beans, rinsed and drained (you can use chilli beans for more heat if you like things hot)
1 can Mexican flavoured tomatoes
2 tablespoons hot pepper Tabasco sauce
1-1/2 teaspoons chili powder
1/2 teaspoon ground cumin
1/8 teaspoon crushed red pepper flakes
1 cup cooked brown rice
4 (6 inch) flour tortillas, warmed
1/2 cup salsa
1/2 cup grated cheese
In a large nonstick skillet, saute the green pepper, onion and garlic in oil until tender.
Add the beans, tomatoes, hot sauce, chili powder, cumin and red pepper flakes; bring to a boil.
Reduce heat; simmer, uncovered, until heated through and mixture thickens.
Add rice; cook 5 minutes longer or until heated through.
Spoon a rounded 1/2 cup down the center of each tortilla.
Fold sides over filling and roll up.
Place in a baking dish coated with nonstick cooking spray.
Spoon salsa over each tortilla then cover and bake at 180 degrees C for 25 minutes.
Uncover; sprinkle with cheese and bake 2-3 minutes longer or until cheese is melted.

Thursday, June 30, 2011

Food: Moroccan Lamb and Chickpea Casserole

Another great bean recipe for you, this one stretches out a cheaper cut of lamb to make an economical and tasty dish.

Ingredients:
  • 2 tbsp oil

  • 500g lean shoulder lamb, diced into 3cm pieces

  • 2 onions, peeled and roughly chopped

  • 1 green or red pepper, deseeded and chopped

  • 1/2 cup raisins

  • 400g can Wattie's Moroccan Style Tomatoes

  •  420g can chickpeas, rinsed and drained

  • 2 cups boiling water or chicken stock

  •  Slivered almonds

  • 1 cup couscous

  • 25g butter

  • salt to season


  • 1. Brown the lamb in a very hot, lidded frying pan in the oil until well browned on all sides.
    2. Add the onion, pepper, raisins, tomatoes, chickpeas and one cup of the water or stock and stir to mix.
    3. Cover and simmer gently for 35-40 minutes. Start preparing the couscous 15 minutes before serving.
    Couscous

    4. Pour the other cup of boiling water or stock over the couscous, cover and stand for 10 minutes or until all the liquid has been absorbed. Add the butter, cover and microwave on high power for 5 minutes. Fluff with a fork and season with salt.
    5. Serve the lamb over the couscous and sprinkle over the slivered almonds to serve.
    Monday, June 27, 2011

    Food: Beef and Lentil lasagne

    This coming month I am going to be focusing on stretching the food budget by adding pulses (beans) to our family dinners. The first recipe I want to share is a mince and lentil lasagne that is sure to please the meat eaters and fill hungry tummies!

    Ingredients:
    300g premium minced beef
    1 1/2 cup lentils (cooked or canned)
    1 can pasta sauce (whichever one you enjoy)
    2 tbsp butter
    2 tbsp flour
    3/4 cup trim milk
    Wholemeal instant lasagna sheets
    3/4 cup grated Edam cheese

    Preheat the oven to 180 degrees.
    Brown the mince in a frypan, then add the lentils and sauce and bring to a boil, then take off the heat.
    In a seperate saucepan, mix the flour and butter to make a roux, then add the milk and whisk until bubbling. Or you can cheat and make up a packet of cheese sauce!
    Place half of the meat mixture in a casserole dish, then layer on 2-3 lasagne sheets. Repeat.
    Pour cheese sauce over the last layer of lasagne sheets, then top with grated cheese.
    Sprinkle over the grated cheese and bake in the oven for 30 minutes, then stand for 2-5 minutes before slicing and serving.
    Related Posts Plugin for WordPress, Blogger...